
Operating Specifications And Precautions
Category:
Key words:
Product Details
1. Operation method
1. Routine inspection before leaving the car
1.1. Before the mixer truck starts to work, first check whether there is enough clean hydraulic oil in the oil tank, hydraulic pump and motor, whether the water tank is filled with water, and whether there is enough lubricating oil in each lubricating part.
1.2. Start the car engine and run it for a while, and fill the air tank with air.
1.3. Put the joystick in the neutral position to keep the mixing drum in a stationary state.
Note: If the mixer drum and the engine are started and rotated at the same time, there may be danger and damage to the equipment.
1.4. When the engine is preheating, check the oil pump, motor, reducer and transmission shaft for abnormal noise.
1.5. After everything is normal, operate the handle to make the mixing drum rotate forward and reverse 2~3 times at low speed, check whether the hydraulic transmission system is normal, and whether the mixing drum can perform normal feeding and discharging rotation.
Note: During inspection, do not touch the rotating parts of the equipment with your hands, and be careful not to get your clothes caught in the equipment.
1.6. When the mixer truck is parked in the open field, the mixing drum should be reversed before loading, and the accumulated water (or rainwater) and sundries in the drum should be discharged to ensure the quality of the delivered concrete.
1.7. Check whether the lock handle of the discharge chute is locked.
2. Operation procedure of mixer truck
2.1. Drive the truck under the charging hopper of the mixing station, so that the inlet of the truck is aligned with the outlet of the discharging hopper of the batching station, so as to prevent the concrete from flowing out of the truck and causing waste and pollution of the truck body.
2.2. Operate the handle to make the mixing drum rotate in the feeding direction, the speed is controlled at about 10~12r/min (or adjust according to the feeding needs), then the mixing drum can be fed.
2.3. When installed to the rated capacity, manipulate the handle to adjust the engine speed to 1800r/min, so that the stirring speed of the mixing drum is 1~3r/min, and the engine speed is minimized. In order to prevent misoperation and handle serialization, the handle should be locked in the cab (Figure 5). The maximum time allowed from the start of feeding to the end of unloading is 1.5 hours or the mixing drum rotates 300 revolutions (whichever is shorter).
2.4. After the truck arrives at the delivery location, release the locking mechanism of the unloading chute, and turn the unloading chute and the extended chute to the position to be unloaded.
2.5. Before operating the handles on both sides of the rear of the vehicle, the cab operation and positioning locking plate should be released (see the right picture in Figure 5) to realize the forward and reverse operation of the rear of the mixing drum. The material is then unloaded according to the speed required by the site.
2.6. After each discharge, the feed hopper, the inside and outside of the mixing drum, and the discharge chute must be cleaned to prevent the concrete from solidifying.
3. Operation steps
3.1. With the engine idling, turn the operating handle to the "feed" or "agitation" position. See Figure 6 for maneuvering the sign.
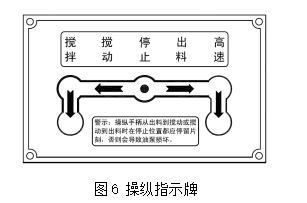
3.1. Feeding, stirring of ready-mixed concrete and driving of concrete mixer truck: turn the operating handle to the "feeding" or "stirring" position, and after adjusting the speed of the mixing drum according to item 2.3, it must be controlled by the flexible shaft before driving. The locking handle of the machine locks the operating handle in the "feed" or "agitation" position, or the flexible shaft control handle in the cab to the locked position (see Figure 5 left).
3.2. Unlock: just unscrew the locking handle of the flexible shaft controller, or loosen the locking device of the cab to unlock.
3.3. Keep rotating during transportation to prevent the concrete from segregating.
3.4. Discharging of ready-mixed concrete: Before the mixer truck arrives at the construction site for unloading, the mixing drum should be rotated at full speed for 1-2 minutes at 12-15r/min, so that the concrete can be fully mixed and evenly mixed, and the operating handle should be turned to the "discharge" position , and the discharge chute should be locked in a certain working position. Adjust the unloading speed according to the needs of the site.
3.5. The stop of the mixing drum: turn the operating handle to the "neutral" or "stop" position.
3.6. Before feeding, turn the joystick to the "discharge" position to remove the accumulated water and dirt in the mixing tank. This operation should be completed under the condition of engine idling.
Note: Whether turning the operating handle from the "in" side to the "out" side, or from the "out" side to the "in" side, it should be slightly moved in the "neutral" or "stop" position Wait until the mixing drum stops rotating before dialing to the next operating position.
1. Adjust the speed of the mixing drum
The speed of the mixing drum is mainly controlled by the displacement of the oil pump. The larger the displacement of the oil pump, the faster the speed of the mixing drum, and vice versa. Reflected on the joystick, the greater the deflection angle from the "neutral" or "stop" position, the faster the mixing drum rotates. Note that the rotating speed of the mixer drum is low at idle speed.
On the other hand, it is related to the speed of the engine. When the output speed of the engine needs to be changed, it is necessary to operate the rear-end handle to accelerate or step on the accelerator in the cab to achieve the speed adjustment of the engine.
2. Mixing concrete with a mixer truck
In addition to transporting pre-mixed concrete, the mixer truck can also directly use the mixer truck to mix concrete. The operation steps are as follows:
5.1. Inject 2/3 of the total water consumption;
5.2. Put 1/2 of the coarse aggregate, 1/2 of the sand and all the cement into the mixing drum in turn;
5.1. Feed the remaining 1/2 of the sand;
5.2. Finally, send the remaining 1/2 coarse aggregate and 1/3 water into it;
5.3. Mixing drum speed and mixing time:
The rotating speed of the mixing drum during feeding: 6~10r/min;
The rotating speed of the mixing drum during stirring: 6~10r/min;
Stirring time: 3~4min;
Transport speed: 3 ~ 4r/min.
5.4. The agitation and discharge after the agitation is completed shall be operated according to the aforementioned method of ready-mixed concrete.
5.5. Note:
1. When mixing concrete, do not only feed cement;
2. The above method is only an example. Since the specific mixing method varies with the type of concrete, please determine the most suitable method and data according to the results of trial mixing.
3. In arid areas, in order to ensure the quality of concrete when mixing concrete is required for long-distance transportation, the water is refilled after delivery to the destination, so the water tank of the mixer truck should be filled with water frequently for urgent needs.
3. Operation of the water system
6.1. Using air pressure water tank for water supply:
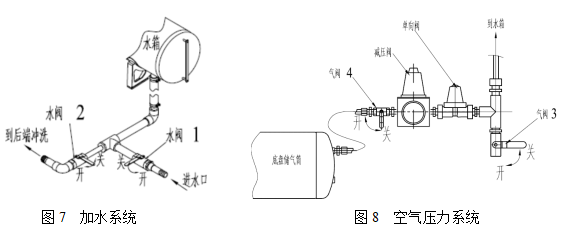
a. When adding water, close the air source switch valve 4 of the chassis first, and open the water tank exhaust switch valve 3 at the same time; close the valve 2, open the valve 1, and add water to the water tank from the water inlet. After the water tank is filled with water, close valve 1 and valve 3. See Figure 7 and Figure 8.
b. Pressurized water supply: Open the chassis air supply switch valve 4, the pressure air of the air storage tank enters the water tank through decompression, and the pressure water tank can work; see Figure 8.
c. Flushing: Open valve 2 to open the back water channel as shown in Figure 7, and flush according to construction requirements or add water to the mixing drum. When washing other parts, you can directly use the water gun at the rear of the car to operate.
6.2. Water supply by water pump (optional):
a. When the water tank is under normal pressure, directly add water to the water tank. When flushing is required, turn on the switch of the water pump first, and then turn on the corresponding valve switch after the water pump is working, and then the corresponding part of the mixer truck can be flushed.
b. After flushing, first turn off the water pump control switch, turn off the motor, and then close the flush valve.
Note: Regardless of any water supply method, when supplying water to the mixing tank, do not turn off the car engine to keep the gas tank charged, or to charge the battery. The chassis air supply switch valve 4 must be closed when driving.
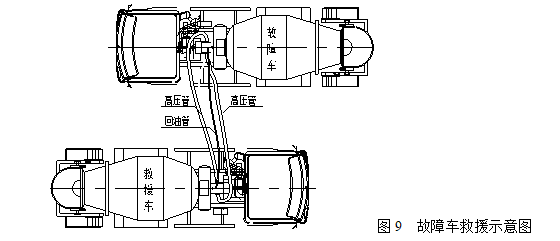
1. Emergency drive:
When the hydraulic pump or transmission shaft of the mixer truck fails and cannot drive the mixing drum to rotate, it can be driven according to the following emergency driving steps to discharge the concrete in the mixing drum (Figure 9):
a. Prepare the emergency drive hose (ie emergency hose); turn off the faulty car, remove the high-pressure oil pipe joint on the hydraulic motor; turn off the rescue vehicle (drive car), remove the high-pressure oil pipe joint of its oil pump, and use The emergency oil pipe is connected with the corresponding joint of the hydraulic motor on the faulty vehicle.
b. Connect the oil return pipeline of the faulty vehicle to the oil return interface of the rescue vehicle;
c. Start the rescue vehicle, turn its joystick to the discharge position, and the concrete in the faulty vehicle will be discharged;
d. After the emergency drive is completed, remove the rescue hose and restore the two vehicles to their original state.
If the above method is difficult to implement, the following method can be used to discharge the concrete immediately.
Put a wooden wedge between the roller and the raceway to control the rotation of the mixing drum, and be sure to pay attention to safety.
Turn off the engine, loosen a high-pressure oil pipe of the hydraulic motor, the mixing drum can rotate freely, control the maintenance hole of the mixing drum to the lower part, and then open the maintenance hole to clear the concrete in the drum. At this time, you must pay attention to safety. After the concrete is discharged, restore the mixer to the original state.
2. Precautions for use
1. Precautions for vehicles:
1.1. When the new car is put into use, it must undergo a comprehensive inspection and test drive. When everything is normal, it can be officially used.
1.2. Before the mixer truck starts to work, the engine should be idling to warm up.
1.3. The capacity, quality and slump of the conveyed concrete shall comply with the specifications in the parameter table.
1.4. The continuous operation time of the working device should not exceed 8h.
1.5. At the time of delivery, if it is found that the evaporation of water and the change of slump cannot meet the user's requirements due to the reasons such as the long transportation distance and the hot weather, water can be appropriately added to the cylinder, and then the speed of 12-14r/min can be added. Rotate for 30 revolutions before unloading.
1.6. The water tank should be filled up frequently for emergency use.
1.7. Do not open the water inlet valve before the water tank is depressurized, and the air source switch of the chassis must be turned off in time after inflating the water supply.
1.8. When parked in winter, there should be no residual water in the water tank and water supply system to prevent freezing and damage to the waterway.
1.9. Whether the discharge chute and the extended chute need to be used together is determined by the requirements of the specific working position.
1.10. Drivers and operators of vehicles must be professionally trained and qualified to drive or operate them.
1.11. After each use, clean the inside and outside of the mixing drum and the inside and outside of the hopper, chute, discharge chute, etc.;
1.12. When cleaning each part of the mixing drum with high pressure water, avoid the instrument and joystick and other parts. The distance between the pressure water nozzle and the painted surface of the vehicle body shall not be less than 40 cm.
1.13. When the vehicle is loaded uphill, the rotation speed of the mixing drum should be accelerated appropriately to prevent material leakage and pollute the road surface.
1.14. When repairing the mixing tank, supporting roller, reducer, hydraulic pump, drive shaft, etc., as well as refueling, adding grease and changing oil, the operating lever must also be placed in the neutral position, and the engine must be turned off.
1.15. After the engine stops running, do not pull the lever forcibly to avoid damaging the hydraulic pump.
1.16. Before loading the concrete mixer truck, the remaining water and debris in the mixing drum should be drained.
1.17. When the ambient temperature is higher than 25°C, the duration from loading, transporting, to unloading shall not exceed 60 minutes, and when the ambient temperature is lower than 25°C, the above-mentioned time shall not exceed 90 minutes. And the mixing drum is connected and operated for no more than 300 revolutions according to the regulations. When driving with agitation, the maximum speed should not exceed 50 km/h.
1.18. The wear of the stirring blades should be checked regularly and repaired and replaced in time.
1.19. When leaving the cab for loading and unloading, be sure to fully lock the brakes and lock the wheels before starting work.
2. Precautions when driving:
2.1. During the no-load operation of the mixer truck and the delivery of concrete, the mixing drum must not stop rotating to avoid partial damage to the raceways and rollers or the segregation of the concrete.
2.2. When driving on the road, remove the extended chute, place it on the fender and hang it with hooks; use the locking device to lock the unloading chute on the frame to prevent it from shaking due to instability and causing injury to people Accidents and affect the operation of other vehicles.

2.1. When vehicles pass through bridges, caves, warehouses and other facilities, they must pay attention to the size of the passing height and the weight of the road surface to avoid damage to the mixer.
2.2. The water tank is only pressurized when supplying water, do not drive on the road with the pressurized water tank, before the water tank is depressurized
Do not drive. When the vehicle is running, turn off the air supply switch of the chassis to the water tank.
2.3. Drivers should load materials reasonably according to the uphill slope of the road they are walking on, so as to avoid spreading materials on the road and polluting the environment.
2.4. The driver should wear a seat belt during driving; it is strictly forbidden to make sharp turns at high speed with full load;
Long slopes; vehicles equipped with exhaust brakes should use exhaust brakes as much as possible.
2.5. When driving on uneven roads, the vehicle speed should be strictly controlled to prevent reducers, supporting wheels, etc.
Damaged, and even rollover stories.
2.6. Pay attention to road signs, weather, pedestrians and other surrounding conditions, concentrate on driving, and do not drive fatigued.
1. Precautions for vehicle operation:
3.1. When working beside the discharge hopper and discharge chute, it is necessary to wear protective equipment correctly. Do not approach the hopper and mixing port, do not look inward, and do not touch the rotating mixing drum with your hands.

3.1. Whether the operating handle is turned from the "feed" side to the "discharge" side, or from the "discharge" side to the "feed" side, it should be slightly moved in the "neutral" or "stop" position. Wait until the mixing drum stops rotating before dialing to the next operating position.
3.2. Do not use excessive force during operation.
3.3. When the mixing drum is in the rotating state, the engine cannot be turned off. After the mixing drum stops running, the engine can be turned off.
3.4. Keep rotating during transportation to prevent concrete from segregating.
3.5. Before the concrete mixer truck arrives at the construction site and unloads, the mixing drum should be rotated at full speed at 12-15r/min for 1-2min, and then reverse unloading.
3.6. During the unloading process, the material is generally unloaded at an idling speed, and it is strictly forbidden to slam the accelerator.
When going up and down the ladder, hold the handrail firmly, and use the correct way to go up and down to prevent stepping on the air, sliding and falling.
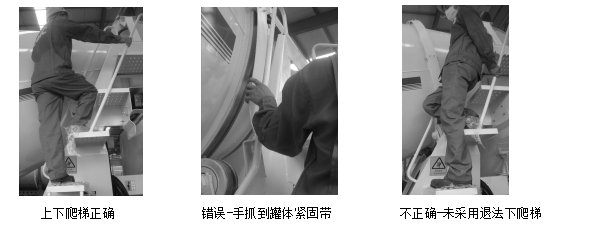
3.1. If the handrails, pedals, fenders and other parts are cracked, oily, or frozen, they should be repaired or cleaned to prevent them from falling off during climbing operations.
3.2. When using the extended chute for unloading operations, do not put your hand between the unloading chute and the extended chute to prevent injury. When the extended trough discharge and the main discharge trough are folded and placed, they must be locked.
1. Precautions when clearing operations:
When cleaning the mixer truck, please observe the following items to prevent personal accidents.
4.1. Prevent the mixing drum from rotating: put the joystick in the neutral position, turn off the engine, and pull out the key of the engine, which will be kept by the operator.
4.2. When cleaning operations in the mixing drum, in addition to 4.1, the maintenance must be done inside and outside the mixing drum:
a. Use two U-shaped tongs to firmly fix between the raceway and the left and right supporting rollers, and ensure that the mixing drum cannot rotate and the U-shaped tongs do not fall off.
b. Use C-type strong U-type pliers, the maximum opening size is 125mm, and the load resistance is 5500kg.
c. Hang a sign with the words "Someone is working in the mixing drum" in an obvious position.
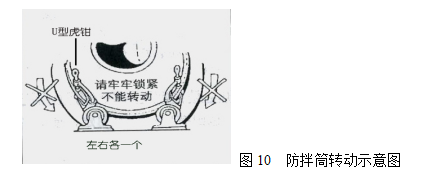
4.1. When cleaning, it should be done symmetrically from left to right.
4.2. The removal work should be carried out when the adhering concrete is not much.
4.3. If there is a lot of concrete sticking, the sticking part should be placed below to prevent the large piece of concrete from falling and hurting people.
4.4. It must be ensured that the mixing drum is well ventilated, the air is fresh, there is no stagnant water, no combustible gas and harmful dust, and sufficient oxygen supply (no pure oxygen is allowed).
4.5. When using electric tools in the cylinder, the operator must have good insulation protection and self-protection.
4.6. Please use necessary protective tools, such as dust masks, protective glasses and earplugs.
1. Precautions for the use of hydraulic system:
5.1. Before the new car is put into use, first check and remove the dust and debris from all parts of the hydraulic system, and check whether the connections are correct and whether there are other problems.
5.2. Start the engine, operate the handle to make the mixing drum rotate forward at low speed, and observe whether the hydraulic system works normally.
5.3. Note that the fan on the radiator should be running within the range of 65°C to 70°C. When the fan fails to operate, it should be repaired in time.
5.4. The pressures of the relief valve, low pressure relief valve and high pressure relief valve of the charging pump have been set at the factory and cannot be changed arbitrarily.
5.5. There should be no oil leakage in each component and pipeline in the oil circuit. If leakage occurs, it should be repaired in time.
5.6. Do not repair or adjust at will when it is working.
5.7. If the hydraulic oil pump or motor fails, it needs to be replaced in time and sent to the professional designated maintenance department for repair.
5.8. When replacing hydraulic oil, the air in the system should be exhausted;
5.9. Different brands of hydraulic oil cannot be mixed. When replacing the hydraulic oil, the original hydraulic oil in the tank must be completely drained before adding new hydraulic oil.
5.10. Hydraulic oil change cycle: 500 working hours for the first time, and every 2000 working hours or one year thereafter, the hydraulic oil filter element must be replaced at the same time when changing the oil.
5.11. Reducer oil change cycle: 150 working hours for the first time, and every 2000 working hours or one year thereafter.
5.12. Pay attention to the following points when removing the old oil pump and motor and installing the new oil pump and motor:
a. When removing the old oil pump and motor, the oil pipe should be removed first, and the oil ports on the oil pump and oil pipe should be sealed immediately to prevent dust from entering the oil pump and pipeline, and then the oil pump and motor should be removed from the mixer truck.
b. Install the oil pump and motor smoothly. Note: Tighten the screws to the specified torque, and seal the oil pump, motor oil port and hose.
c. After all the oil pipes are installed, unscrew the oil plug of the R port of the oil pump (or loosen the oil inlet), exhaust the air in the pump, and then tighten the R port oil plug (or imported oil).
d. Remove the motor, add clean hydraulic oil to the motor from the top T oil port (oil discharge port) connector until it is full, and then tighten the pipe connector.
e. The hydraulic oil is first filtered through a 10um filter screen, and then add oil from the oil filling port on the oil tank to check the oil level of the oil tank. If it is not above the middle of the liquid level, clean hydraulic oil must be added in place.
f. Start the engine, idle at idle speed for 10 minutes (the two handles of the control box are all in the middle position, and the mixing drum does not move), check the noise of the oil pump, motor and whether there is oil leakage in each oil pipe).
g. Slowly operate the joystick, and make the mixing drum rotate in a slower feeding direction for 20 minutes in one direction (there is no material in the mixing drum, and the car is at idle speed).
h. Return the joystick to the middle position to stop the mixing drum, check the oil level in the oil tank, and add oil to the middle position.
2. Warm reminder:
6.1. It is strictly forbidden to carry out transportation operations when the joystick is in the maximum feeding state.
6.2. When the vehicle is running, the discharge chute must be locked.

6.1. When the mixing drum is reversed, it is strictly forbidden to change the direction of the joystick sharply.
6.2. On roads with many detours, poor road conditions and complex environments, please strictly control the driving speed.
6.3. Lubricate the drive shaft and roller every week.
6.4. Reducer oil change cycle: 150 working hours for the first time, and every 2000 working hours or one year thereafter.
6.5. Hydraulic oil change cycle: 500 working hours for the first time, and every 2000 working hours or one year thereafter, the hydraulic oil filter element must be replaced at the same time when the oil is changed.
6.6. Maintenance work is prohibited when the vehicle is in operation. Keep the whole vehicle clean and perform regular maintenance according to the requirements of this manual.
6.7. It is strictly forbidden to modify or remove the safety devices of the equipment without authorization.
6.8. Quickly stir the ready-mixed concrete for 1-2 minutes before unloading.
6.9. Whenever, when opening and closing the water inlet of the cleaning tank and cleaning operations, the inlet and outlet should not face the personnel directly.

Product Inquiry

